
How to Set Up Double Opt-In in Flodesk (+ an Alternative)
A double opt-in is basically a two-step process to make sure someone really wants to subscribe to your emails.
Here’s how it works:
Step 1: Sign Up
Someone fills out your form. They enter their name and email (and maybe other info).
Step 2: Confirm Subscription
They get an email asking them to click a button to confirm they want to subscribe.
Until they click, they aren’t added to your list. This helps prevent fake signups, spam, or typos.
This is useful because it ensures your list has real, engaged subscribers and it helps with deliverability (less chance of being marked as spam). It’s also required in some regions (like GDPR in Europe).
The trade-off is that you might lose a few subscribers who never click the confirmation. The ones who do confirm, though, are usually highly engaged, which is better long-term.
Double Opt-In vs Single Opt-In in Email Marketing
Single Opt-In
That’s when a subscriber enters their email and is immediately added to your list.
Pros:
- Quick and easy signup → higher conversion rates.
- No extra step, so fewer people drop off.
Cons:
- Risk of fake/spam emails being added.
- Slightly higher chance of deliverability issues.
Double Opt-In
After signing up, the subscriber receives a confirmation email and must click a link to finalize subscription.
Pros:
- Only engaged subscribers are added → higher quality list.
- Better deliverability, fewer spam complaints.
- Often required for GDPR or EU compliance.
Cons:
- Some subscribers never click → slightly lower overall conversions.
- Extra step may reduce signups.
The single opt-in is great for lead magnets, freebie downloads, and fast-growing lists where friction hurts conversions.
The double opt-in is best for long-term email health, high engagement, and compliance, especially if your content is paid or if you want a very clean, active list.
So, if your goal is fast list growth, the single opt-in works better.
If your goal is high-quality subscribers and strong deliverability, though, double opt-in is safer.
Now, let’s see how to set that up in Flodesk.
How It Works in Flodesk
When you go to Opt-in setup, you’ll see the option to enable double opt-in. That means that your subscriber will first get a confirmation email asking them to confirm their subscription.
Only after they click that button are they officially added to your segment and triggered into any workflow (like your welcome sequence).
Double Opt-In + Welcome Email
If you have both Double Opt-In ON and a Welcome Email set up, subscribers will get two emails:
1. The confirmation email (Flodesk’s default message).
2. Then your welcome email (after they confirm).
You’ve got two good options depending on your goals:
Option 1: Keep Double Opt-In ON
This is best for deliverability and GDPR compliance. Just make sure your confirmation email is short and friendly, and remove any “welcome” language, it’s just for confirming.
Then your welcome email feels like a natural follow-up once they confirm.
Option 2: Turn Double Opt-In OFF
This is best for lead magnets or quick signups where you want less friction.
Subscribers will be added instantly and get your welcome email only.
It’s still safe if you’re clear about consent and aren’t in the EU.
Many creators choose Option 2.
They turn off double opt-in for smoother lead magnet delivery, and make the welcome email feel personal + valuable.
But Flodesk recommends using double opt-in, as it helps prevent spam, bots, and low-quality subscribers while ensuring your list is comprised of genuinely interested individuals.
Differences
Double Opt-In Email
It’s universal across your entire Flodesk account. Meaning, it’s the same for all forms.
You can edit it once (text, logo, button, etc.), but you can’t have a different confirmation email per form.
Everyone who signs up (if double opt-in is ON) gets that same confirmation message.
Welcome Emails
These are individual per form, you can set a unique welcome email (or sequence) for each opt-in form.
For example:
My Free Blogging Course form can trigger a course welcome email.
My “Sponsored Blogging Guide” form can trigger a totally different one.
Each form has its own workflow and its own custom welcome email(s).
So yes:
Double opt-in = same for all forms.
Welcome emails = customized for each form/workflow.
How a Flodesk workflow would look for each method
Let’s go through what the subscriber sees and how the workflow works in Flodesk for single vs. double opt-in.
Single Opt-In Workflow
- Subscriber signs up via your form.
- They are instantly added to your list/segment.
- Your Welcome Email (or workflow sequence) is sent immediately.
- Optional: follow-up emails in a workflow continue automatically.
Subscriber experience:
- Quick and smooth. They get the freebie or welcome email right away.
- No extra click required.
Best for: lead magnets, fast-growing lists, low-friction signup forms.
Double Opt-In Workflow
- Subscriber signs up via your form.
- They receive a confirmation email (Flodesk’s double opt-in email).
- Only after clicking the confirmation link are they added to your list/segment.
- Your Welcome Email is sent after confirmation.
- Follow-up emails continue as part of your workflow.
Subscriber experience:
- Extra step, but ensures they really want your emails.
- Reduces fake or mistyped addresses.
Best for high-quality list building and paid offers or long-term nurturing sequences.
Tip for Flodesk:
- You can customize your Welcome Email per form, but the double opt-in email is the same for all forms.
- If you want smooth delivery, make the confirmation email short, friendly, and match your brand voice.
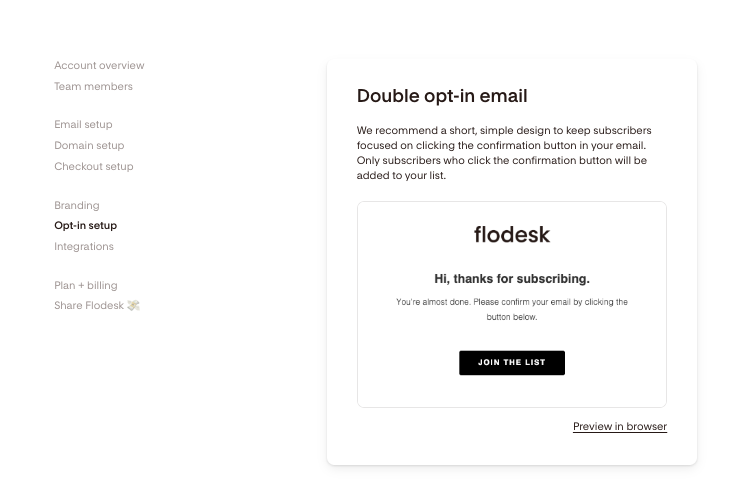
How to Enable Double Opt-In in Flodesk
Step 1: Go to Flodesk > Opt-in setup
Click ‘Edit’.
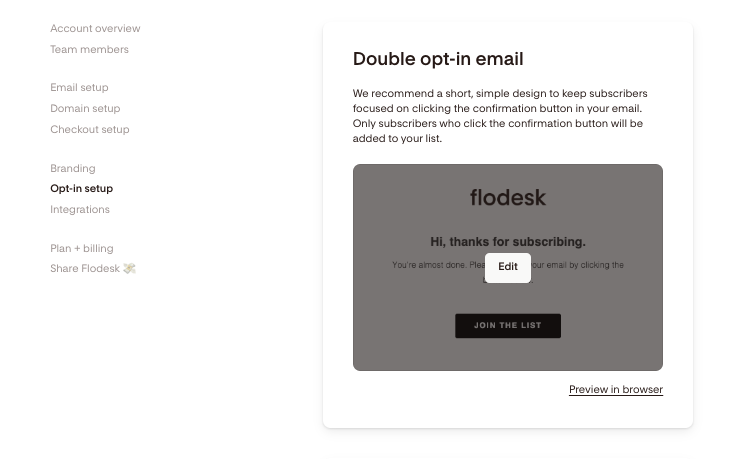
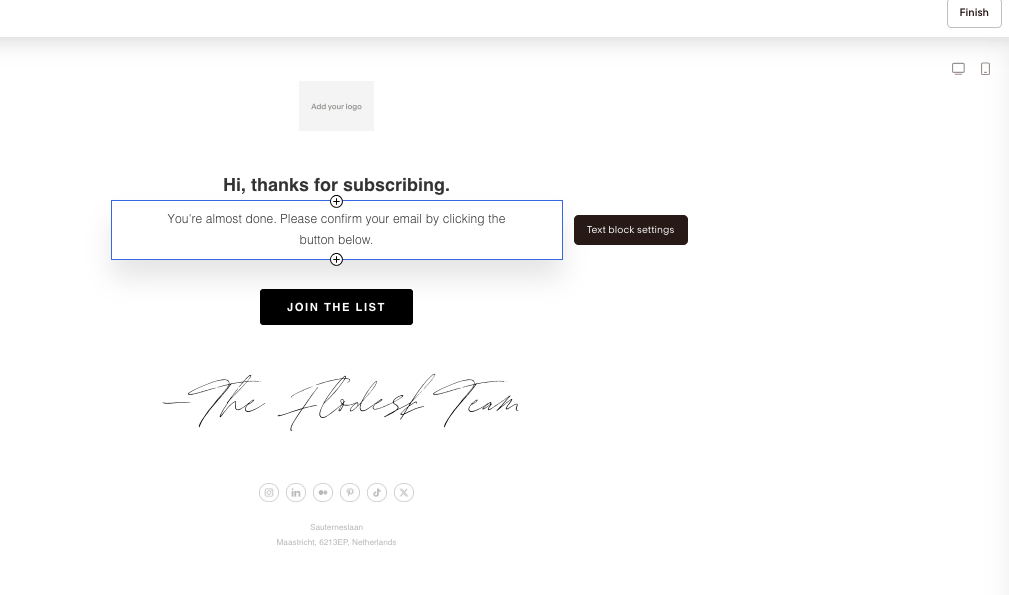
Step 2: Customize the confirmation email.
- Brand it with your logo and colors.
- Keep it short and friendly: “Click below to confirm your subscription.”
- Click Finish when done.
You’ll then be taken to the previous page again and can preview the email in your browser.
Step 3: Set Your Confirmation Workflow
If you have a workflow set up, there are more steps to take.
Most importantly, make sure your welcome email is in a workflow triggered after confirmation. This ensures subscribers don’t get two emails at once.
Step 4: Test It
- Sign up with your own email.
- Make sure you:
- Receive the confirmation email.
- Click the link and get added to your segment.
- Receive your welcome email afterward.
Thank You Page
You’ll also see a Thank you page under the double opt-in form.
It’s optional and you can skip it. In that case, when a subscriber submits the form, Flodesk triggers the double opt-in email. After they confirm, they get your welcome email (or workflow if you have one).
But if you want a Thank You page, keep in mind it’s not an email. It’s the page that shows immediately after someone submits the form (before they click the double opt-in confirmation link).
You can customize it with a message like: “Thanks for signing up! Check your inbox to confirm your subscription.”
And that’s it. That’s how you set up a double-opt in inside Flodesk.
Let me know if you have any questions.


![How to Create an Automated Email Sequence [Flodesk Workflows Tutorial]](https://bloggingwithlidiya.com/wp-content/uploads/2026/01/how-to-create-an-automated-email-sequence-flodesk-workflows-tutorial-768x432.jpg)