How to Install Yoast SEO & Verify Your Site with Google, Bing & Pinterest
As a new mommy blogger using WordPress, there are some plugins you need to install and start using so your site can function properly.
I list more of them in my free blogging course The Passive Income Blog Boss, but today, I want to show you how to set up one of them – Yoast SEO.
That’s the top SEO WordPress plugin, and once you set it up, you can easily optimize your content and make sure your site is visible in search engines and indexed correctly.
Even if you aren’t tech-savvy, simply follow the steps below (with screenshots). It’s important to do things right from the start so your site is verified with the major search engines, before you move onto other blogging tasks. Plus, these are things you need to do just once.
Let’s see what the steps are.
How to Set Up Yoast SEO
1. Activate the plugin.
Go to Plugins > Add New. Type ‘Yoast’ and you’ll see it. It’s one of the top SEO WordPress plugins, with 10 million downloads.
Install and activate it.

2. First-time configuration.
You can now start the first-time configuration (you’ll see a button for that on the next page).
Explore all the features it offers and enable or disable any of them.

Here’s what I have enabled. Don’t forget to save the changes for each section.
In General
Site features:
- SEO analysis;
- Readability analysis;
- Yoast AI;
- Insights;
- Cornerstone content;
- Text link counter;
- Open Graph data;
- X card data;
- Admin bar menu;
- REST API endpoint,
- XML sitemaps.
Site basics:
Here you can add your site name, tagline, pick the separator, and add a site image (it will be used as a fallback for posts/pages that don’t have any images set).
I also have the ‘Restrict advanced settings for authors’ enabled.
Site representation:
Choose whether you’re an organization or person and add your company/personal info based on that.
Site connections:
This is very important. This is where you can easily verify your site with major search engines + Pinterest.

It would be easier if you just get it done now. Definitely do it for Google, Pinterest and Bing. And if you feel like, also for the other available options.
Luckily, under each section is a link that takes you to the right page for verification. It’s a pretty straightforward process, you just have to be logged in the right platforms.
How to verify your site with Bing
For Bing, ti will take you to Bing Webmaster tools and you can get the process started. If you’ve already added another site there that’s being tracked, from this field on top you can add another one.

Add it manually and grab the HTML Meta Tag you’ll see (one of the verification methods you’ll be given). Copy it and paste it in the Bing field inside Yoast SEO.
Don’t forget to save the changes.
Then, back in Bing, click ‘Verify’. Your site should be added successfully now and there’s nothing else you need to do for this one.
How to verify your site with Google
For Google, you’ll be taken to Google Search Console (if that’s your very first blog, definitely sign up for GSC, you’ll need it).
Again, you can add your site (it’s called a property here). Paste the URL or just the domain name and continue.
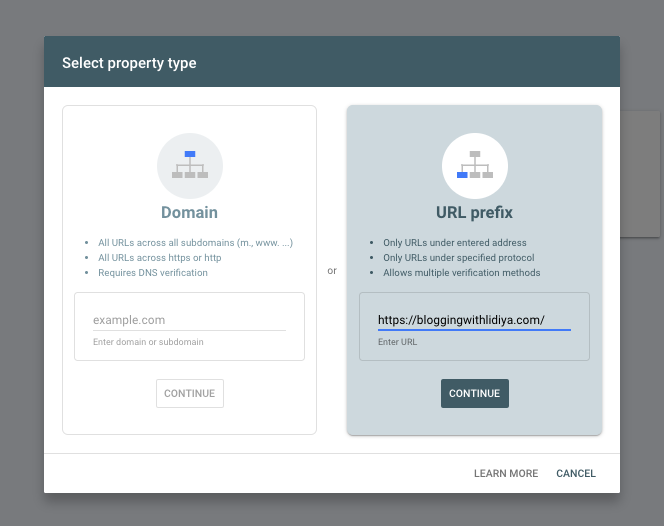
On the next page, again go to the HTML tag and copy it.
Paste it in Yoast and save the changes.
In GSC, click ‘Verify’ (in that HTML section). It should work the first time. If not, try again.

How to claim your site with Pinterest
Next, let’s claim your site with Pinterest. Start a Pinterest account first if you haven’t already and switch to a business one.
Then, from Yoast, follow the link under the Pinterest section and you’ll be taken to the ‘Claimed external accounts’ page in your Pinterest account.
Click ‘Claim’ next to website.
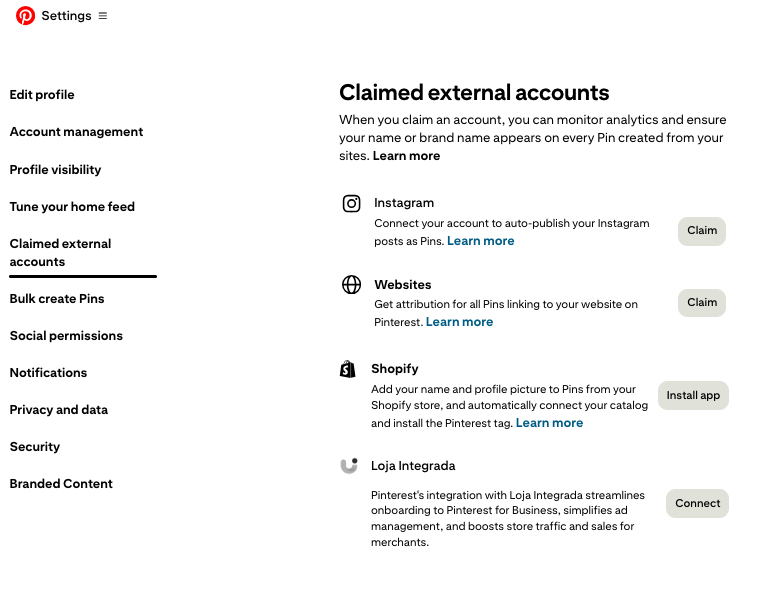
Copy the HTML tag, paste it in Yoast, and save the changes.
In Pinterest, click Continue. Then you’ll be asked to type in your website URL and click Verify.
For me it didn’t work right away so I waited a little and tried again. Then it was verified. I typed the www.domainname.com version, without https.
Once you’ve done this, we can move onto the next settings inside Yoast SEO. They are in the Content types section.
In Content Types
Posts:
- Leave ‘Show posts in search results’ enabled.
- For SEO title, I only left ’Title’.
Pages:
- Leave ‘Show pages in search results’ enabled.
In Categories & tags
Categories:
- Show categories in search results.
- Enable SEO controls and assessments.
- Show the categories prefix in the slug.
Tags:
Leave disabled. No need to index your archive pages for tags as they don’t really provide any value.
Advanced Settings
llms.txt
This is a new one, and it’s to ‘Future-proof your website for visibility in AI tools like ChatGPT and Google Gemini. This helps them provide better, more accurate information about your site.’
I left it enabled (it was by default).
Author Archives
I disabled those. That’s recommended for a single-author blog. It would only create duplicate content if you enable it (your blog’s page is basically your author’s archives too).
Date Archives
I also disable these for SEO purposes. Again, it can lead to duplicate content issues and it’s simply not necessary.
Format Archives
Disabled.
Even the plugin says ‘Format-based archives can cause duplicate content issues. For most sites, we recommend that you disable this setting.’
All these are enabled by default, thought, so you’ll have to actually disable them.
Final words
And that’s it. You can leave things this way, your Yoast SEO plugin is all set, and you can move onto your next blogging tasks.
Got any questions? Leave a comment below.
Are you a first-time Yoast SEO user? If so, how easy or hard did you find the setup?